Tutorials
Editing Photos in CEWE PHOTOSHOW
Do you know about our free photo editing software CEWE PHOTOSHOW? It comes installed along with our free, downloadable Creator Software. It’s a handy program for performing basic photo editing before you turn your images into a beautiful Photo Book or stunning piece of Wall Art. CEWE PHOTOSHOW gives you the chance to edit colours, shapes and more in a fun, unique way.
Read on for more information about how it works and the creative options available.
How Does It Work?
If you’ve already got the CEWE Design Software installed, you’ll automatically have CEWE PHOTOSHOW installed along with it. If you haven’t already downloaded our software, we’d definitely recommend you do! Not only will you have access to CEWE PHOTOSHOW, but our award-winning design software is the best creative route we offer, with the widest range of products and design options available.
When you first open CEWE PHOTOSHOW, you’ll immediately be prompted to take a short tour of the options available to you. If you’re a beginner to photo editing software, we recommend following our short tutorial to learn about the available tools.
Eight Possibilities With CEWE PHOTOSHOW
To help get you started with the program, we’ve come up with eight ways you can creatively edit your photos using CEWE PHOTOSHOW. Feel free to experiment and play around a bit. Find a few photos you’d like to try the software out on and follow along with our guide below.
1. Emphasise Colour
The picture you see above is actually far more colourful in reality. The pots of spices are each an explosion of bright colours. We’ve chosen to isolate the yellow of the middle-left pot as an example. If you’re someone who has a lot of colour in your interiors, perhaps you’d like the colours in your wall art to stand out too?
To do this, follow these steps:
- Open the Photo
- Go to ‘editing’
- Select the lasso tool
- Roughly outline the colour you’d like to keep
- Click “Invert Selection”
- Go to Colour Effects and select black and white
- You’ll now see an image like the one above!
2. Get Your Spirit Level
As you can see, there’s something strange going on with the picture above. Although it’s a lovely photo, unfortunately it was taken crookedly, which you can see by the sea level. CEWE PHOTOSHOW gives you a way to easily solve this problem. Go to Adjustments and then click “Straighten”. You can either drag the bar or enter the number of degrees you’d like to adjust your photo’s level by. This is also useful if you’d like to make a straight photo crooked for a unique effect!
3. Specific Cropping with the Lasso Tool
With CEWE PHOTOSHOW you can easily crop specific items or people out of your photos if they don’t “belong” in your composition. Or, as in our example, we’ve isolated the fireworks in the night sky. Go to Adjustments and choose the “Crop” option which has an icon showing two people. Roughly draw around the object you’d like to keep in view, then select crop!
4. Colour Adjustments
Sometimes you want to give a photo a unique effect by adjusting the colours. Let’s use the last picture of fireworks as an example. Go to ‘Colour Effects’ and select ‘Recolour’. Then, choose the colour you’d like and edit its hue and strength. The fine adjustments are most useful if you’d just like to add a gentle tint rather than a full colour change.
5. Noise Reduction
It’s easy to reduce noise in your images using CEWE PHOTOSHOW. Go to Image optimisations and select “Reduce Noise”, then the intensity and press OK. After this your image should be cleaned up nicely.
6. Beautiful Portraits
Similar to the image filter function on your smartphone, we have a range of tools to beautify your portraits. To find these options, go to “Image optimisations”. You can start with “Beautiful Portrait”, which will identify faces and remove blemishes, as well as whiten teeth. If you’d like to further improve the photo, we suggest using “Bright Eyes” as well as “Brighten up Shadows” and/or “Reduce Noise” for that perfect, bright portrait.
7. Artistic Effects
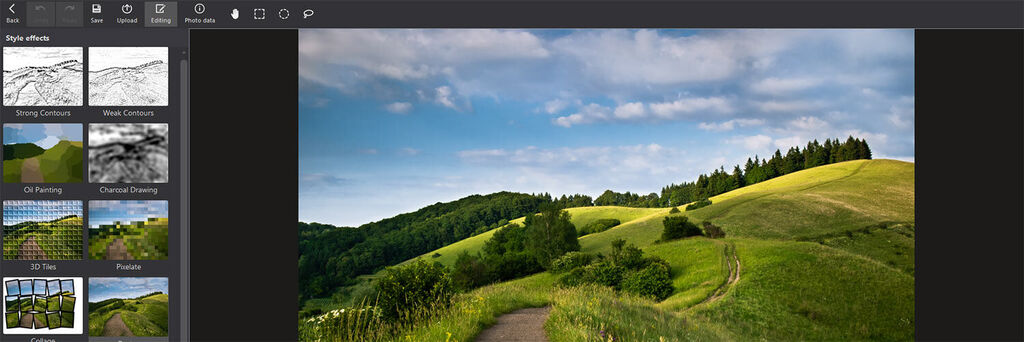
We have a wide range of options available under “Style Effects” in the editing menu. Above you can see an example where we’ve turned a landscape photograph into an oil painting just by using one of the artistic effects available in CEWE PHOTOSHOW. As well as the oil painting, you can transform your photo into a charcoal drawing or collage. Other special effects available include a “Ripple” effect, a “Spray” effect, vignettes and more.
8. Correctly Saving Your Images
CEWE PHOTOSHOW can be opened in one of two ways. Firstly, by opening the program directly as you would any other. Or, if you double-click an image you’d like to include in a product while working in our Design Software, CEWE PHOTOSHOW will open automatically to allow you to begin editing immediately.
Once your masterpiece is complete, you’ll be given the option to save the edited version of your picture separately, which we always recommend. This way, you’ll still have the original to include in a product or work with at a later date.
We hope you’ve found our introductory guide to CEWE PHOTOSHOW helpful!
As always, if you create a CEWE product you love, be sure to share it with us on Facebook, Twitter or Instagram.


