Inspiration
Photo Books with Text: 6 ways to enhance your story (and tips on how to do it well)
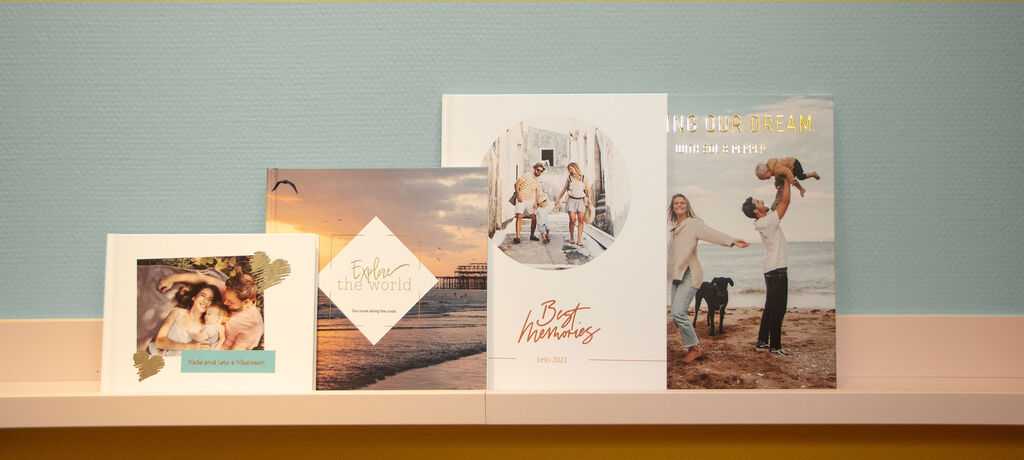
A picture might paint a thousand words, but sometimes adding a caption or a message can help tell a richer story in your photo book. Of course, you want your photography skills to shine first and foremost. However, one big benefit of personalised photo books with text is that there are no restrictions on your creative expression.
So whether you want to add the perfect line or whole pages of writing, here are our tips on creating photo books with text.
Why create a personalised photo book with text?
One of the reasons you might love photography is that it captures a moment forever. Yet even when you catch an image of special points in time, the events around them can start to fade. Creating photo books with captions will help you encapsulate your memories, so you’ll never forget the joke that made you laugh or the whisper that made you smile.
So, if you make your own book with photos and text, how could adding messages enhance the story of each of your shots?
Add stories to travel photography
Location names, facts about your destination or that amazing restaurant you visited might all be forgotten without a small caption in your travel photo book. Although your stunning landscapes and portraits will do most of the talking, adding in a line or two about the places you’ve explored will prompt your memories as you show off the book to others.
Say thank you or celebrate people
What better way to mark a milestone birthday or express gratitude for that special someone than by capturing all your favourite memories of them. Share a moment you remember from each of your child’s birthdays, remind your best friend why you’re still so close or write a poem to capture love and thanks for your partner.
Highlight life’s biggest occasions
Build a special gift for your partner or parents by putting together images of all your little one’s ‘firsts’ in a baby photo book. Or, if you’ve been a guest at a couple’s big day, you might want to capture all your memories of it for them, from the guest’s point of view, and give them your own version of a wedding photo book as a one-year anniversary gift.
Take a peek behind the scenes
Capture every step of your journey in a beautiful journal and create the best photo book with text. Turn a regular photo book into a detailed journal to add a deeper layer to your 'Story of You.' Share behind-the-scenes thoughts and experiences, such as planning a special event like a wedding, embarking on a new adventure, or simply enjoying life's everyday moments. From picking the perfect wedding dress to discovering your favorite food spots, documenting these details turns your photo book into a truly unique story!
Don’t lose a single family recipe
Instead, spend a day in the kitchen creating your favourite family foods, take pictures of the results and turn them into a unique cookbook where you include the recipes. Keep it for yourself or pass it on to a loved one so they can accurately recreate the dishes they love most.
Capture a year of special moments
Commemorate all the big and small adventures of the last 12 months in a yearbook. Alongside the images, you can include captions or anecdotes about these special times, so you can always look back and remember the best times.
Tips to build your best photo and text book
You can design every single element of your photo book, and that includes choosing which text to add and how much to include. So when you want to create a book that tells a story, or you have more to say than a picture alone can express, you can set your inner writer free.
1. Choose a photo book template with text areas
The first step for creating any photo book is to collect all your images together and figure out the best order to tell your story. Alongside this, working out what you want to write and how this will fit next to each photo is helpful. Then you can choose the best option to fit your text and images from a huge number of templates of photo books with captions in the CEWE Creator Software. You can always go back and edit your layout, page order or text and photo areas to fit everything the way you want it to.
Creating your first ever photo book?
We have put together a handy step–by-step guide to making your first CEWE PHOTOBOOK with the free CEWE Creator Software. We also run regular webinars where we can answer your questions in real time, as we create a photo book together.
2. Choose a Matte paper for easy reading
For photo books that contain a lot of text, sometimes a glossy finish can make it more difficult to read the words. We’d recommend going for our True Matte Paper or Photographic Matte Paper. They both have a smooth, non-reflective finish, meaning your text is easily readable without any glare.
3. Choose or combine hundreds of complimentary fonts
Different fonts can give your book a very different look and feel. Our Creator Software comes with a varied range of installed fonts, but if you have one typeface you really love, you can upload that from your computer too. If you download a new font to your computer, simply close and reopen the software and you’ll see it appear in the list of fonts.
4. Pick or mix colours to fit your colour scheme
Set the mood for your story with the right shade. Choose from one of the basic preset colours or use the colour picker tool to get the exact hue you like.
You can also pick a screen colour using the dropper tool. This lets you match your text to an element in your images. For example, the colour of the sky in one of your photographs or the colour of a frame you’ve used on an image.
5. Select the right font size for your story (and the reader)
Set the size of your text by using the size drop down, or type in a font size manually. You can also use the plus and minus buttons to increase or decrease the size with just a click. One handy feature is that different words within one text box can be different sizes. Perfect if you want to create a heading or make an individual word bigger for emphasis.
Tip: For a unique, beautiful touch, choose from an extensive collection of typography clip art elements. This will make your highlights feel even more special.
6. Move your text box to the perfect place
Text can be placed anywhere on the page. Overlay text on images, add small captions to your photos, or fill an entire page with words: the choice is yours. Not happy? Simply drag and drop the text box to another position until you get the right fit.
Tip: Write in an arch or circle with the new TextArt feature in Creator Software to create interesting visual effects.
How else can you personalise your photo book?
Using our Creator Software on a desktop or mobile app, you can add a huge number of personal elements to your photo book. From design elements like Highlights to maps and videos that bring your memories to life, our Assistant, videos and tutorials make it easy to create the perfect personalised photo book with text.


